|
Bracelet

เริ่มต้นการทำข้อมือด้วบการเลือกใหมนะค่ะ
ถ้าทำแบบที่กำลังจะสอน
ใช้อย่างน้อยห้าเส้นค่ะ
เลือกใหมสีที่ต้องการ
ถ้ามากกว่าห้าเส้นขนาดก็จะเพิ่มไปตามเส้นค่ะคือใหญ่ขึ้น
ใหมที่ใช้สามารถใช้ใหม
ครอสติส หรือใหม่ญี่ปุ่นค่ะ
ถ้าหาใหมญี่ปุ่นได้จะออกมาดูดีกว่าค่ะคือมันจะแวว

พอเลือกใหมเสร็จแล้วก็มาตัดขนาดความยาว
ยาวพอสมควร ประมาณครึ่งเมตรได้ค่ะ
ตัดใหมที่เลือกสีไว้แล้ว
ห้าเส้นหรือมากกว่านั้นให้เท่ากัน

เสร็จแล้วเว้นความยาวส่วนที่เอาไว้ผูก
กะขนาดพอสมควรกับข้อมือ
แล้วมัดเป็นปรมอย่างในรูปค่ะ
หลังจากมัดปรมแล้วก่อนอื่นต้องหาที่ผูดติดก่อนนะค่ะเอาไว้ยึดเวลาเราถัก
ใช้เข็มนิทติ้งหรือปากกา
หรือผูกติดกับอะไรก็ได้ค่ะ
หรือว่าให้เพื่อนจับให้
แต่ผูกส่วนที่เป็นที่มัดนะค่ะ
ไม่ใช่ที่เอาไว้ถัก

ตรงนี้อาจจะงงหน่อยนะค่ะแต่ทำความเข้าใจนิด
อฐิบายไม่ค่อยเก่งค่ะ
แยกใหมออกจากกันอย่างในภาพค่ะเลือกจะเอาอันไหนขึ้นก่อนหรือหลัง
อย่างเช่นอย่างในรูป
เหลือง แดง ม่วง นํ้าตาล
ฟ้า
เส้นแลกคือเส้นสีเหลือง
เอาออกมาจากพวกที่เลียงไว้ใช้เป็นเส้นขึ้นต้นเส้นแลก
เอาเส้นสีเหลือง วางทับเส้นที่สองคือเส้นสีแดง
แล้วสอดปลายไปข้างใต้เส้นสีแดง
แล้วเอาปลายมาระหวางกลางเส้นสีแดงและสีเหลือง

เสร็จแล้วดึงเส้นสีเหลืองขึ้นมาค่ะ

ดึงมาจนสุดดึงให้ตรึง
แนนะนำนิดนะค่ะ ว่าเราจำเป็นจะต้องจับเส้นหลักให้ตรึง
หมายถึงเส้นที่อยู่ที่มือซ้ายของเราค่ะ
เวลาถักอย่าทำให้เส้นหลักหย่อนเด็ดขาดเพราะเวลาดึง
จะทำให้มันกลับกันแล้วออกมาไมาสวยค่ะ

เสร็จแล้วกฌทำเส้นต่อไปค่ะเส้นสีม่วง

ทำต่อไปเรือยๆ จำให้ได้นะค่ะว่าเส้นไหนอยู่ก่อนอยู่หลังห้ามทำสับกันเด็ดขาด
ช่วงสามแถวแลกจะทำให้งงนิดนะค่ะ
แต่หลังจากนั้นก็ง่ายแล้วค่ะ

พอทำสีเหลืองเสร็จก็มาทำสีแดงค่ะทำเหมือนกัน
ทำตามสีที่เราเริ่มก่อนไปจนจบ

พอเสร็จสีแดงก็จะออกมาเป็นอย่างนี้รูปมั่วนิดนะค่ะโทษที

พอเสร้จเส้น หนึ่ง ก็
สอง สาม สี่ ไปเรื่อยๆ
ค่ะ มันจะออกมาประมาณนี้
ทำไป จนถึงขนาดข้อมือของเราค่ะ
แล้วก็ผูกปมเหมือนกับที่ขึ้นต้นค่ะ
ส่วนของส่วนที่ผูกเราจะปล่อบมันไว้อย่างนั้นก็ได้
หรือถักเป็นเปียสามก็ได้ค่ะ
แล้วแต่ว่าเราจะทำยังไง

เส้นนี้แตกต่างจากเส้นที่สอนไปตรงว่า
ใช้สีระสองเส้นค่ะ ทำไมถึงใช้สีระสองเส้น?
เพราะมันออกมาดูใหญ่กว่าและชัดกว่าค่ะ
วิธีทำเหมือนกันค่ะ
ทำที่ละสี แต่สีเดียวกันต้องอยู่คู่กันนะค่ะ
P.S.หวังว่าอฐิบายให้ฟังไม่อยากเกินไปนะค่ะ
มองดูจากภาพสอนอยากมากค่ะ
สอนตัวต่อตัวเข้าใจง่ายมากกว่า
ถ้าไม่เข้าใจถามได้นะค่ะ
ถ้าได้ลองหัดทำแล้วสำเหร็จรบกวนถ่ายรูปมาให้ดูหน่อยนะค่ะ
แล้วใครที่ได้มาลองทำรบกวนช่วยเม้นบอกด้วยนะค่ะ
ว่ามาดูวิธีนะค่ะ
P.S.ถักเสร็จแล้วมันจะคดนะค่ะ
เวลาใส่มันก็ไม่คดค่ะ
แต่ว่าเราใช้เตารีดทับเอาก็ได้ค่ะ

Hemp Friendship Bracelet
You Need:
--6 Yards
#20
Hemp
--Misc. Beads
--Masking Tape
Instructions:
Preparing your cord: Cut hemp into two 3 yard lengths.
Fold both pieces 18" from the end. Gather the folded strands together. You now have two 18" strands and two 7½' strands. Tie
all together into a knot 4" from the fold. Secure by taping to table top at fold.You could also use a clipboard or slip loop
made by fold around a chair leg. Pull both 18" strands taut and tape down ends. These will become strands 2 & 3 in the
diagrams below.
Making the knots:
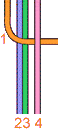
Cross strand 1 over strands 2 & 3 and under strand 4.
| Bring strand 4 under strands 2 & 3, then up through the loop created by strand 1. Tighten.
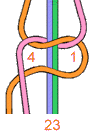
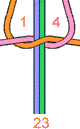
Cross strand 1 over strands 2 & 3 and under strand 4.
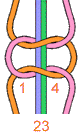
Bring strand 4 under strands 2 & 3, then up through the loop created by strand 1. Tighten.
Adding
Beads:
Beads can be added at any point on the bracelet. You can string them on one, two or all four strands. On the bracelet
shown above, beads where strung only on strands 2 & 3.
Finishing:
When you reach the desired length, make
a knot to match the other end. Remove tape. Trim ends, leaving enough to tie on wrist. Make a knot on each strand end to keep
from fraying, adding a bead if desired.
FRIENDSHIP BRACELETS
1.Gather the 6 ends and tie an overhand knot leaving a 8" - 9" (21-23 cm) tail.
Arrange them in the order you would like for your bracelet. Tape knotted end to a table or tie to a chair.

2.Take the first string on the left F and wrap it over and around the next string R to make a knot. Tighten by holding
R and pulling up on string F

3.Make a second knot the same way with string F over and around string R. Pull up on F to tighten.

4.Now drop string R and pick up string I. Make two knots with string F over and around string I.

5.Repeat on strings E, N, and the last string D making two knots on each with string F. Now F will be on the right.
This makes one complete row.

6.Continue the next row by taking the first string on the left, now string R, and making two knots over and around
each of the other strings I, E, N, D and F. With each row the string on the left is worked over to the right side.

7.When you have woven enough to fit around your wrist, tie another overhand knot to complete. To wear the bracelet,
tie the two ends together in a square knot and trim the extra strings.
ลองเข้าไปดูเวปพวกนี้นะค่ะ
มีอีกหลายแบบ
http://www.mediamessage.com/kayton/GirlScouts/bracelet3.htm
http://www.mediamessage.com/kayton/GirlScouts/bracelet5.htm
http://www.mediamessage.com/kayton/GirlScouts/bracelet2.htm
http://www.rings-things.com/Projects/68002-49.htm
http://www.expage.com/page/makingjewelry
http://www.mediamessage.com/kayton/GirlScouts/bracelet4.htm
http://www.makingfriends.com/friendship.htm
http://www.makingfriends.com/j_faith.htm
http://www.makingfriends.com/jewelry/bracelet_klutz.htm
ยังมีอีกหลายแบบค่ะ
ไว้มีเวลาเมื่อไหร่จะมาอัพเดทแบบอื่นนะค่ะ
ขอบคุณค่ะ
|